In the HTML documents so far studied we designed only one-way communication in the web. The HTML documents open and show the messages. Forms are the tools to improve user interface in the web. Using forms, we can design a web page on which a user can communicate his wish, option, suggection, etc. When an advertisement is made for a seminar, applicants can apply in a form attached to the advertisement.
9.1 Action Attribute
Forms are used to get inputs from users. The user input is submitted to the server. The action attribute informs the browser the location of the server to which the form input has to be submitted. For example, suppose we want a program "\cgi-bin \comments.exe" to be executed when the form is submitted. This means that "comments.exe" is a file that exits in a directory "cig\bin". Then we must mention the following attribute value in the <form> tag.
action ="/cgi-bin/comments.exe"
The name of the executable progame and the location of the directory depend upon the web server. we can also enter a complete URL, host name, etc. If we leave out the starting part of the URL, the browser will submit the form to the server which supplied the form. This is illustrated in Fig 9.1
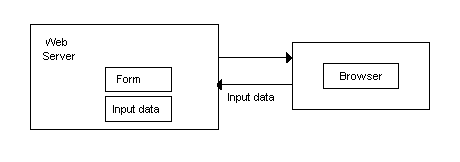
Form Supplied and Input Collected
9.2 Method Attribute
The method attribute has only two choices of values. They are
method = "get"
method = "post"
These denote the protocol the server user in implementing the form's features. Usually the user is put into the data stream of the HTTP, and the back-end program can read the data as input through the "standard input" data stream.
In the case of method = "get",the data recived in the form are placed at the end of the URL. If the form is very big and has a number of inputs, the "method causes the URL to be very long. So the method = "get" option is often discouraged.
9.3 Enctype Attribute
This attribute is used to inform the server the way to handle the encryption process. Usually it is set to application/x-www-form-urlencoded. That is, value is given as:
enctype ="applicatoin/x-www-form-urlencoded"
A typical <FORM> tag is shown as follows.
<form action = "cgi-bin/comments.exe" method = "post"enctype = "application/x-www-form-urlencoded">
............ .
............ .
</form>
In a form, there can be several elements to get inputs from the users. They are :
drop down lists
check boxes
radio buttons
text feilds
text area
password field
hidden field
submit button
reset button
9.4 Drop Down List
A drop down list presents a list to the user. The user can select his choise from the list. This is done using the <select> tag. The drop down list definition begains with the <select> tag and ends with the </select> tag.
The <select> tag has three attributes. They are the:
name attribute
size attribute
multiple attribute 9.4.1 Name Attribute
The name attribute asigns a name for a variable, which will hold the selected choise. For example, suppose the list shows the choices of the qualification as follows.
- Illiterate
- Matriculate
- Graduate
- Post-graduate
- Doctorate
From the above list, the user selects one to specify his qualification. So a variable name qualification can be assigned in the name attribute. The select attribute will look like the one shown as follows.
<select name = qualification>
................
....................
</select>
Each option of the list is mentioned with the <option> </option> tags. So the complete HTML code to design the drop list is shown as follows, and the drop down menu is shown in Fig 9.2
<form action = "/cgi-bin/comments.exe" method = "post" enctype = "application/x-www-form-urlencoded">
please select your educational qualification
<select name = qualification>
<option>Illiterate </option>
<option>Matriculate</option>
<option>Graduate</option>
<option>Postgraduate</option>
<option>Doctorate</option>
</select>
</form>
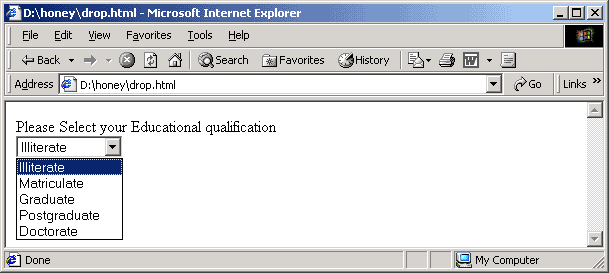
Adrop Down List
In the above drop down list if we select Graduate, the value of the varriable qualification is assigned as qualification ="Graduate" and this input data is sent to the web server as described earlier in this chapter. Instead of assigning qualification = "Graduate" and sending the input to the server. Suppose we assign the code as follows.
Code Choise
1 Illiterate
2 Matriculate
3 Graduate
4 Postgraduate
5 Doctorate
We can design the HTML code in such a way that the drop down list shows the choises , and the code value is sent to the server. This is done with the value attribute in the option tag. The code values are assigned as follows.
<select name = qualification>
<option value = "1"> Illiterate </option>
<option value = "2">Matriculate </option>
<option value = "3">Graduate </option>
<option value = "4">Postgraduate </option>
<option value = "5">Doctorate </option>
</select>
In this case the drop down list is the same one as shown in fig 9.2. But when the user selects Graduate, the value 3 is assigned to the qualification and sent to the web server.
9.4.2 Size Attribute
In the form, when we click the arrow in the corner of the field, the drop down list appears. When the list is long, it is diffcult to mannabe on the screen for the user. So we can define the number of items in the list to be shown. Other items can be seen by pressing the scroll arrows in the list. This is done using the size attribute. Suppose we want only three items to apper on the list. then we can give the <select name = qualification size =3>
The complete code is as follows:
<select name = qualification size=3>
<option value = "1"> Illiterate </option>
<option value = "2">Matriculate </option>
<option value = "3">Graduate </option>
<option value = "4">Postgraduate </option>
<option value = "5">Doctorate </option>
</select>
The dropdown list appears as shown in Fig 9.3.
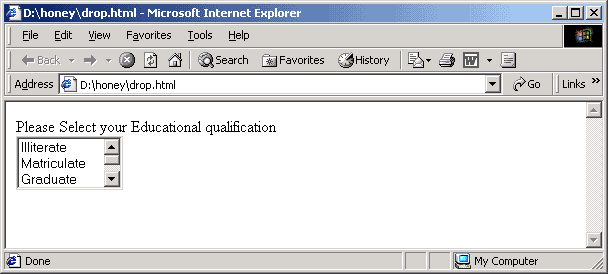
A Drop Down List With Size 3
9.4.3 Multiple Attribute
In the drop down list, we normally select one of the items. There are certain cases in which the user can be given freedom to select more than one of the options. For example consider the following:
Which are the games you like to play?
Hockey
Football
Cricket
Chess
Tennis
The user may select more than one from the list. Similarly, consider the following. Which are the states you have visted in South India?
Tamil Nadu
Kerala
Karnataka
Andhra Pradesh
The user may select more than one, even all. This type of drop down listbis called a multiple choise drop down list. We design the multiple chiose drop down list using the multiple attribute of the <select> tag as follows:
Which are the games you like to play?
<select name = games multiple = "multiple">
<option value = "H"> Hockey </option>
<option value = "F"> Football </option>
<option value = "C"> Cricket </option>
<option value = "S"> Chess </option>
<option value = "T"> Tennis </option>
</select>
</p>
The drop list apperes as shown in Fig. 9.4.
The user can select more than one option, and the data are sent to the server. Consider the following HTML code
<p>
Which are the states you are visited in South India ?
<select name = states size = 3 multiple = "multiple">
<option value = "T"> Tamil Nadu </option>
<option value = "KL">Kerala </option>
<option value = "KN">Karnataka </option>
<option value = "A"> Andhra Pradesh </option>
</select>
</p>
The output apperes as shown in Fig. 9.5.
9.4.4
Check Boxes
Check boxes are another form of user interface to get input. We can get the reply for some "yes or no question" using check boxes. For example, suppose we want to get the users reply to the following questions.
Do you have interest in Hockey ?
Do you have interest in Football ?
Do you have interest in Cricket ?
Do you have interest in Chess ?
Do you have interest in Tennis ?
This can be done by asking one question, and having some check boxes shown below it.
Are you interested in the following games?
Hockey
Football
Cricket
Chess
Tennis
Each box shown above in the above question is called a check box. When this apperes in a form, the user can select any box by clicking on the box. In order to creat a check box we use the <input> tag with the attribute type = "checkbox". The above group of checkboxes can be defined using the following HTML code.
<p>
Are you interested in the following games?
<br>
Hockey: <input type = "checkbox" name = "hockey">
Football:<input type = "checkbox" name = "football">
Cricket <input type ="checkbox" name = "cricket">
Chess <input type = "checkbox" name = "chess">
Tennis <input type = "checkbox" name = "tennis">
</p>
Notice that the user can select more than one checkbox. The output apperes as shown in Fig.9.6.